How can we make learning Grade 3 forces and motion exciting and hands-on for students? One of the best ways is by incorporating Rube Goldberg Machines into your science lessons. These whimsical, chain-reaction machines illustrate how different forces interact in a fun and creative way, helping students build a deep understanding of forces and motion through real-world application. This blog post will explore a lesson plan that provides a step-by-step guide to teaching Grade 3 forces and motion with Rube Goldberg Machines, allowing students to design and apply their knowledge of forces to encourage problem-solving, creativity, and collaboration.

Want access to ready-made worksheets and assessments? The full Ignited Lessons Club resource package for this lesson includes student templates, step-by-step activity guides, and assessment tools to make your lesson even easier to implement!
Grade 3 Forces and Motion – Rube Goldberg Machines Lesson
This engaging lesson allows students to explore forces and motion by designing their own Rube Goldberg Machines. They will work through identifying forces, sequencing events, and applying their understanding of motion to create a functioning design.
Lesson Objective:
Students will apply their knowledge of forces and motion by designing a Rube Goldberg machine that completes a simple task.
Teacher-Directed
Step 1: Activate Prior Knowledge
Begin by asking students in small groups:
- Can you name all of the forces we have been studying?
- Can you think of any real-world devices that use several forces to move?
Encourage students to brainstorm examples such as bicycles, windmills, or playground swings.
Step 2: Introduce Rube Goldberg Machines
Introduce the concept of Rube Goldberg Machines, explaining that they are complex machines designed to complete simple tasks in many steps. To help students visualize, show the All About Rube Goldberg – NG for Kids video:
Watch here
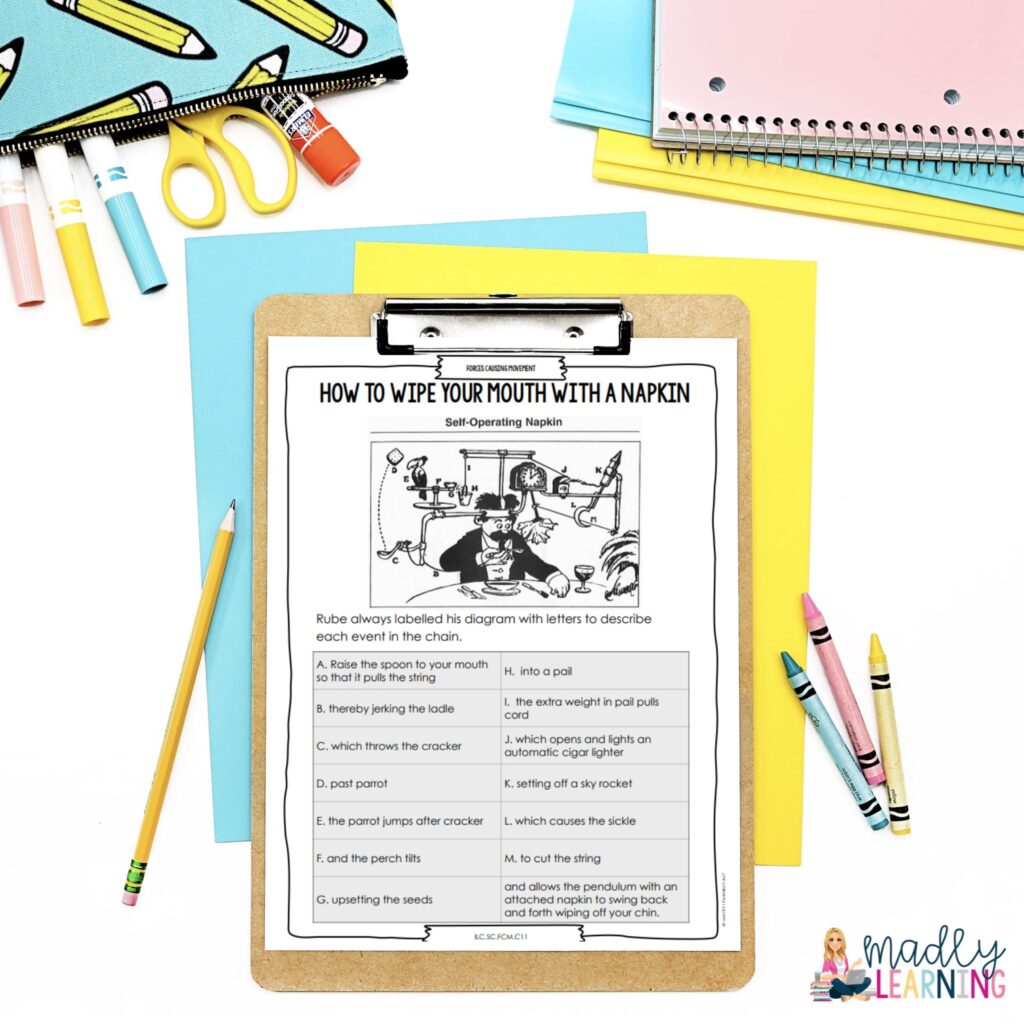
Step 3: Class Activity – How to Wipe Your Mouth
As a class, analyze a famous Rube Goldberg machine: Rube’s Self-Operating Napkin. Display the image and work through:
- Labeling the steps in the sequence
- Identifying the forces used (push, pull, gravity, friction, etc.)
(Ignited Lessons Club includes a worksheet template for this activity!)
Step 4: Planning Their Own Rube Goldberg Machine
Now, inform students they will be designing their own Rube Goldberg Machine. Show additional videos to provide inspiration:
- Rube Goldberg Machine Explained
- Rube Goldberg Machine Example
- PeeWee’s Breakfast Machine
- Wallace and Gromit Cracking Contraptions
Student Independent Learning Task
Step 1: Read-Aloud or Video
Introduce Rube Goldberg’s Normal Humdrum School Day to spark ideas. You can read the book aloud or watch the narrated video:
Watch here
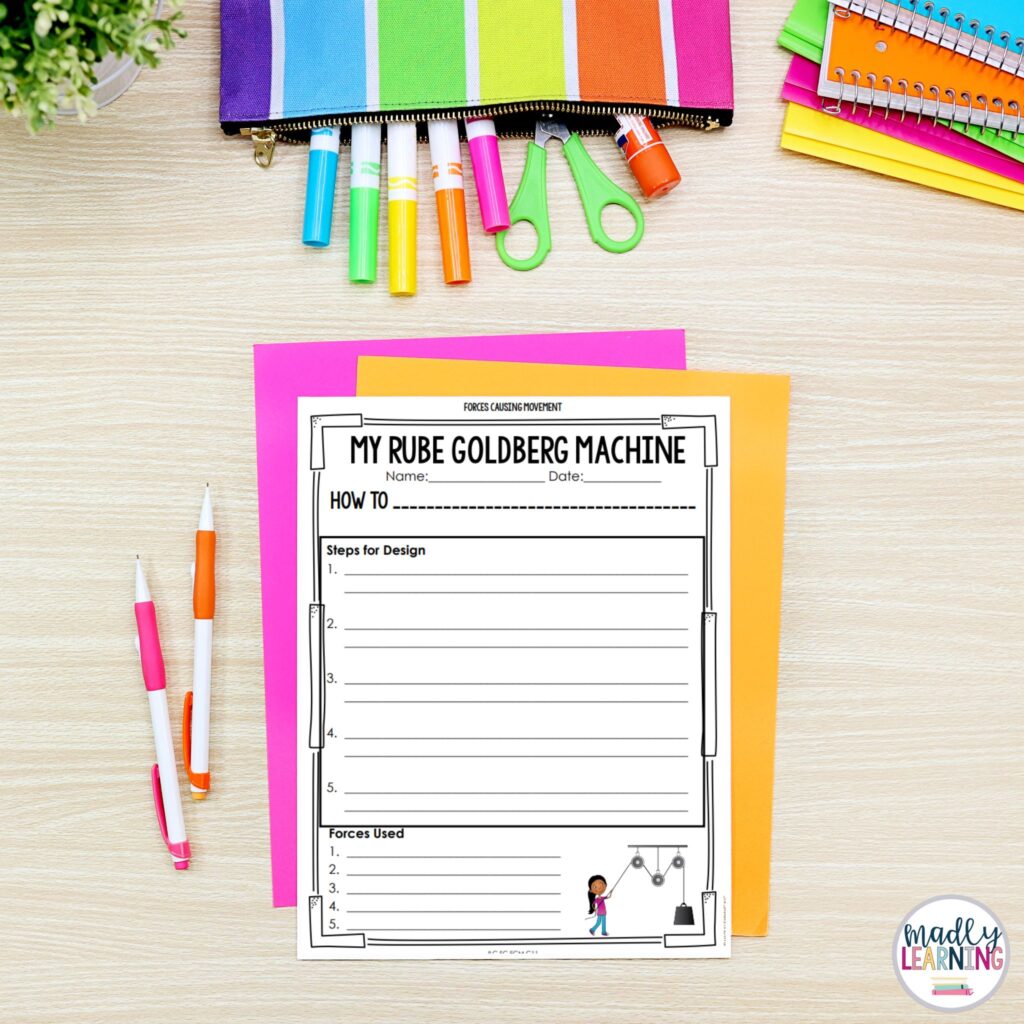
Step 2: Designing Their Own Machine
Students will decide on the function of their Rube Goldberg Machine. Some ideas include:
- Brushing teeth
- Kicking a ball
- Picking up dirty laundry
- Turning on a gaming console
- Dipping a french fry in ketchup
- Pulling covers up on their bed
- Brushing their pet
(Ignited Lessons Club includes a planning template to help students organize their design!)
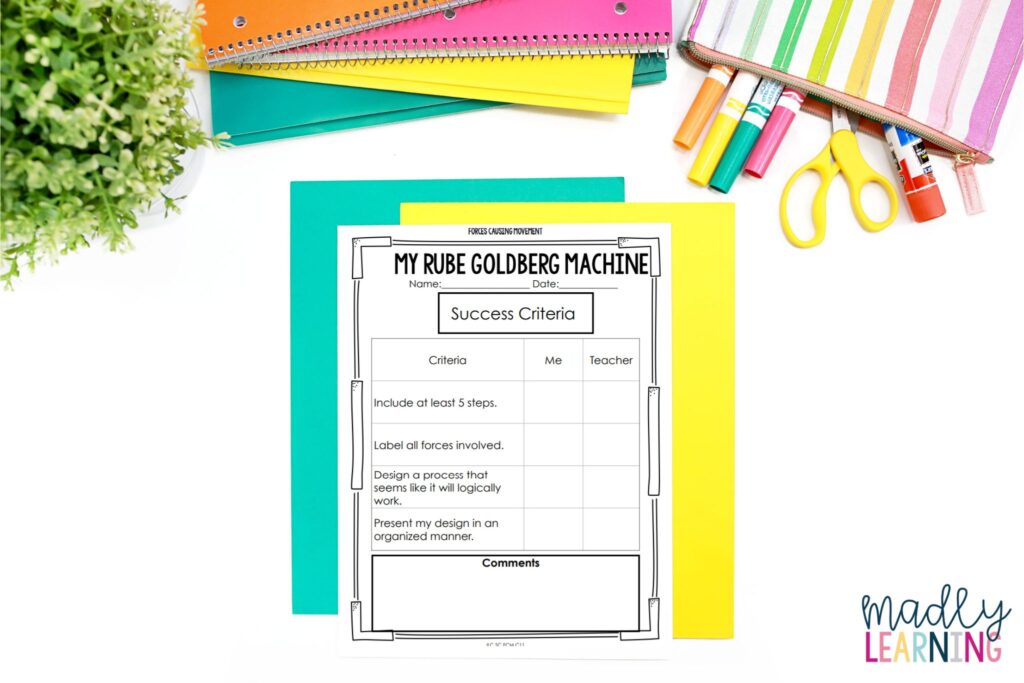
Step 3: Success Criteria
Before students start sketching, review the expectations:
- Include at least 5 steps in their design.
- Label all forces involved in each step.
- Create a process that seems logically functional.
- Present the design in a clear and organized manner.
Students can work individually or in small groups. It is important to note that they are only sketching and planning the device, not physically creating it!
(Ignited Lessons Club includes a success criteria page to help students organize their design and meet lesson objectives!)
Assessment and Reflection
After completing their designs, students will present their Rube Goldberg machines to the class and reflect on their learning.
- Assessments can include:
- A checklist based on the success criteria
- Peer feedback and self-reflection
- A short written or verbal explanation of how forces and motion were applied in their design
Extension Activity: Build the Machine!
For students who are eager to take their designs further, an extension activity could involve building and testing their Rube Goldberg Machines using everyday objects. This hands-on project allows students to observe how real forces interact and make modifications based on their results.
(This extension is optional and can be facilitated if time and resources allow!)
Bringing Science to Life with the Ignited Lessons Club
Want a ready-made lesson plan with worksheets, templates, and assessments to make this activity even easier to implement? The Ignited Lessons Club includes:
- Step-by-step lesson guides for teaching forces and motion
- Printable student templates for sketching Rube Goldberg designs
- Assessment tools to evaluate student understanding
👉 Join the Ignited Lessons Club today! Click here to learn more
Ready to teach Grade 3 Forces and Motion?
Teaching Grade 3 forces and motion with Rube Goldberg Machines provides students with a fun, creative, and meaningful way to apply their knowledge of forces. By designing their own machines, students develop skills in problem-solving, critical thinking, and collaboration, making science lessons both engaging and memorable.
For even more curriculum-aligned science lessons, explore the Ignited Lessons Club—your go-to resource for interactive and hands-on learning experiences! Or grab our Grade 3 Forces and Motion complete unit!